
![]()
Welcome to the Arcserve UDP Appliance Quick Start Guide. This Quick Start Guide provides the overview instructions necessary to install, set up, and operate the Arcserve UDP backup appliance. It is recommended that you read these instructions before starting the setup and become familiar with the more comprehensive information contained in the Arcserve UDP Appliance User Guide (arcserve.com/udp-appliance-userguide).
Each Arcserve UDP 7000 series appliance is a self-contained, "set and forget" backup and recovery solution. The Arcserve UDP 7000 series is the first complete and most cost-effective data protection appliance, featuring Assured Recovery™. Architected with cloud-native capabilities, its unmatched ease of deployment and usability combined with a broad set of features such as global source-based deduplication, multi-site replication, tape support, and automated data recovery capabilities. The Arcserve UDP 7000 series delivers unmatched operational agility and efficiency, and truly simplifies disaster recovery activities.
The Arcserve UDP 7000 series appliance is fully integrated with the industry-leading Arcserve Unified Data Protection software pre-installed in state-of-the art hardware. The appliance provides a complete and integrated data protection solution for all users to not only meet your current demands, but also the ever-changing backup, archive, and disaster recovery requirements of the future.

![]()
- Inspect the box that the appliance was shipped in and ensure that there are no visible signs of damage. If there is evidence of damage, please retain all packaging materials and contact Arcserve Support immediately at: arcserve.com/support.
- Review the detailed safety precautions at arcserve.com/udp-appliance-userguide.

![]()
- Arcserve UDP Appliance (serial number label is located on rear of appliance)
- Power cable: 2
- Network cables: 1 red, 1 blue (3-feet long each), 1 black (7-feet long - IPMI)
- Rail/Rack Mounting Kit - consisting of 2 quick-install outer rails, 2 inner rail extensions, 3 rail adapters (standard rail mounting only), and attaching hardware (as needed)
- Arcserve faceplate
- Quick Start Guide
- Microsoft Client Access License
Note: If any items are missing, please contact Arcserve Support at: arcserve.com/support.

![]()
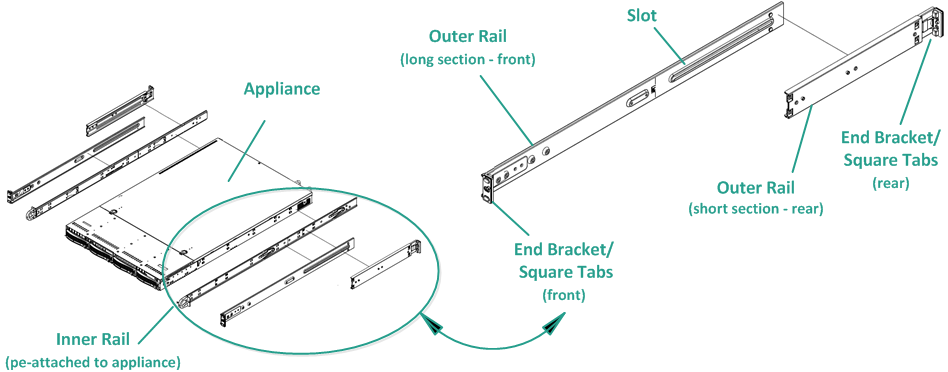
Delivered with the appliance is a rail/rack mounting kit. This kit provides the quick-install outer rails, inner rail extensions, and mounting hardware which can be used as needed to secure the appliance to any rack configuration. (Rail adapters are also provided, but are for use only with the optional standard mounting rails and not the quick-install rails).
Rack mount cabinets and attachments can vary by different manufacturers. Ensure you have sufficient rack mounting hardware to properly secure the rails in your environment.
IMPORTANT! This appliance is only for use in a restricted location (authorized access and secured/controlled by locking device).
1. Verify the area where the appliance will be located is dry and well-ventilated (free from front and rear obstructions that could inhibit air flow). In addition, ensure the area maintains a constant cool operating temperature, and does not generate heat, electrical noise, or electromagnetic fields.
Note: Each of the outer rails consists of two sections. When assembled, the long section gets attached to the front rack post and the short section gets attached to the rear rack post.
2. Assemble the long section to the short section, aligning the pins with the corresponding slotted openings, and making sure the end brackets are facing in the same direction.
3. Locate the short section against the rear post of the rack so that the two square tabs are aligned with the corresponding square holes in the post. Apply pressure to snap (and lock) the rail to the rear post.
4. Adjust the overall length of the assembled outer rails so that the rail will fit snugly (and level) within the rack.
5. Locate the long section against the front post of the rack so that the two square tabs are aligned with the corresponding square holes in the post. Apply pressure to snap (and lock) the rail to the front post.
6. Repeat steps 2 through 5 for the other outer rail.
Note: The appliance comes with the inner rails pre-attached to the sides of the appliance. (Inner rail extensions are also provided if needed).
7. Carefully raise the appliance so that the rear end of the inner rails are aligned with the front end of the rack-mounted outer rails and using steady pressure on both sides, slide the appliance into the rack until it locks in place (clicking sound).

![]()
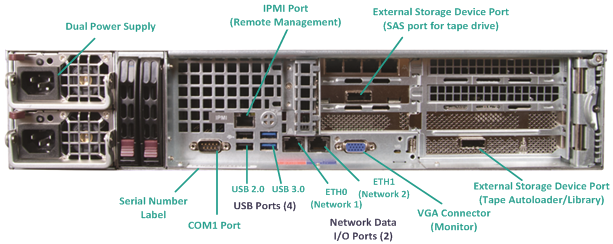
1. Connect the network cables (red and blue) to the corresponding network data I/O serial ports. On the front panel, the corresponding network activity LED comes on. (Network 1 LED = ETH0 port, Network 2 LED = ETH1 port).
2. Connect one end of the power cable into the rear of the appliance and connect the other end to a power supply.
3. Connect cables to your monitor and keyboard (you can use the USB ports or specific ports for your connections).
4. If necessary, you could connect a cable from the dedicated IPMI port to a remote management switch (via network) and assign the IP address to the dedicated port in the BIOS setup.
Note: The default user name/password for IPMI access is ADMIN/ARCADMIN (case-sensitive). Please change it to some other value as soon as possible. Refer to the Arcserve UDP Appliance User Guide for instructions on how to change the default password.
5. If necessary, connect cable from external storage device to the external storage port (SFF-8088).

![]()
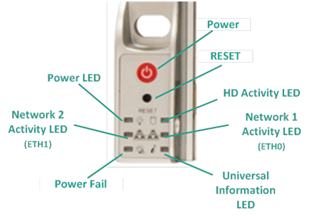
1. From the front panel, press the Power button. The Power LED comes on.
IMPORTANT! When power is first applied to the appliance, it may automatically reboot a few times. This is normal behavior for the initial start.
2. Install the faceplate to the front panel (snap and lock).

![]()
1. When power is initially applied to the appliance, the Arcserve UDP Appliance Wizard is launched. Navigate through each page of the wizard. For more information about the wizard, see the Arcserve UDP Appliance User Guide (arcserve.com/udp-appliance-userguide) or view the video at arcserve.com/udp-appliance-wizard-video.
The wizard lets you perform the following tasks:
- Define the Appliance host name.
- Specify LAN connections for the Appliance.
- Configure email and alert settings.
- Create protection plans. A protection plan lets you define source nodes, backup destination, and configure a backup schedule.
2. Upon completion of the wizard, Arcserve UDP launches the UDP console at the dashboard page.

![]()
Arcserve UDP is a comprehensive solution to protect complex IT environments. The source-side and global deduplication solution protects your data residing in various types of nodes such as Windows, Linux, and virtual machines on VMware ESX servers or Microsoft Hyper-V servers. You can back up data to either a local machine or a recovery point server. A recovery point server is a central server where backups from multiple sources are stored and can be globally deduplicated. For more information about Arcserve UDP, see the Knowledge Center at arcserve.com/udp-knowledge-center.
Arcserve UDP provides the following capabilities:
- Back up the data to deduplication/non-deduplication data stores on recovery point servers
- Back up recovery points to tape
- Create virtual standby machines from backup data
- Replicate backup data to recovery point servers and remote recovery point servers
- Restore backup data and perform Bare Metal Recovery (BMR)
- Copy selected data backup files to a secondary backup location
- Configure and manage Arcserve High Availability (HA) for critical servers in your environment

If you encounter any issues with your appliance, please visit our Arcserve Support site to search our Knowledge Base for solutions to common problems or to get Live Support for immediate assistance (the serial number is located on rear of appliance) at: arcserve.com/support

Each Arcserve UDP 7000 series appliance comes with a 3-year hardware warranty. For detailed information about this warranty, please visit arcserve.com/udp-appliance-warranty.
![]()
Copyright © 2015 Arcserve (USA), LLC and its affiliates and subsidiaries. All rights reserved.
Last updated: 08/21/2015